How to Do Cobra Pose Safely (Bhujangasana)
Step-by-step guidance on cobra pose for beginners: hand placement, spinal lift, common mistakes, and safe modifications to protect your lower back.
Cobra pose shows up in almost every beginner yoga class, and for good reason. It opens the chest, strengthens the back body, and gives you a tangible sense of what it feels like to lift through the spine rather than compress it. Done with care, it feels genuinely good. Rushed or forced, it can pinch the lower back or strain the shoulders.
This guide walks you through exactly how to set up, lift, and come out of cobra safely, along with the adjustments that make the biggest difference when you're just starting out.
If you're pregnant, recovering from a back or wrist injury, or managing any health condition, check with your doctor or a physical therapist before adding backbends to your practice.
Setting Up Before You Lift
Good cobra starts before you press up an inch.
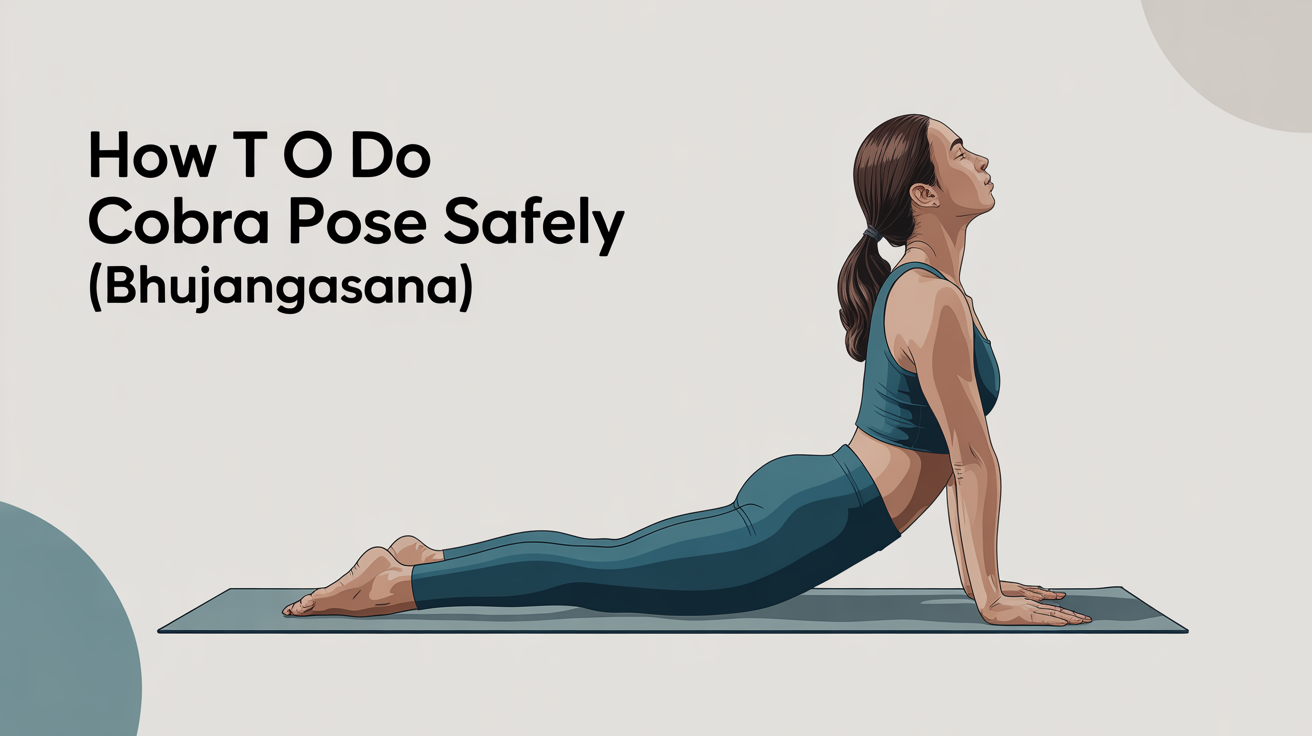
Lie face-down on your mat with your legs extended and the tops of your feet pressing lightly into the floor. Take a moment here. Notice how your hips and lower belly feel against the mat.
Hands: Place your palms flat beside your lower ribs, roughly under your shoulders or a few inches further back than that. If your hands are too far forward, you'll wind up in a different pose entirely. Spread your fingers and press evenly across the whole palm, including the knuckle pads at the base of each finger.
Elbows: Keep them close to your body, pointing straight back, not flaring out to the sides. This single adjustment protects the shoulder joints and keeps the lift in the right direction.
Legs: Press the tops of your feet down and draw your inner thighs gently upward, as if you're squeezing a block between your knees. This helps stabilize your pelvis and reduces compression in the lumbar spine.
Take a breath here before you do anything else.
How to Lift Into the Pose
Inhale slowly, and as you exhale, begin to peel your chest away from the mat.
Here is the key distinction for beginners: let your back muscles do most of the work, not your arms. You can test this by hovering your hands off the mat for a moment once you're up. If you collapse immediately, you were relying on arm strength. If you hold a low, steady lift, your back muscles are engaged.
Lift only as high as feels comfortable without gripping your lower back or crunching through the lumbar vertebrae. For many beginners, that means lifting just a few inches. That is a full and valid cobra.
Keep the back of your neck long. Look forward or slightly upward, but don't throw your head back. Your gaze follows your chest, not the other way around.
Hold for three to five breaths, then lower slowly back to the mat on an exhale.
Common Mistakes and How to Avoid Them
A few patterns come up again and again with beginners in cobra.
Hands too far forward. This turns cobra into something closer to a full arm-supported backbend, which puts more demand on your lower back and shoulders than most beginners are ready for. Move your hands back to your lower ribs.
Elbows splaying wide. Flared elbows rotate the shoulder joints outward and reduce your stability. Draw them back in toward your sides.
Squeezing the glutes hard. Gripping the glutes actually compresses the sacrum. Instead, engage your inner thighs and keep your glutes relatively soft.
Lifting too high too fast. Going to your maximum range of motion on the first attempt rarely ends well. Start low, feel what's happening in your spine, and add height gradually over several sessions.
Holding the breath. Breath holding is a sign that you're working at the edge of your range. If you can't breathe easily, come down a bit.
Modifications and Props
Cobra is genuinely adaptable. These adjustments let you work at the level your body is ready for.
| Situation | Modification |
|---|---|
| Tight lower back | Keep lift low, elbows bent at 90 degrees or more |
| Wrist discomfort | Make fists or use a folded blanket under the heels of your hands |
| Neck strain | Keep gaze at the mat, just slightly forward |
| Shoulder stiffness | Move hands a little further back (toward the hips) |
| Pregnancy (first trimester, doctor-cleared) | Wide legs, very low lift only; avoid after first trimester |
A folded blanket under your hip bones can also soften the sensation of lying prone for anyone with sensitive hip flexors.
Cobra Pose vs. Upward Facing Dog
Students often ask how cobra differs from upward facing dog. They look similar but they're meaningfully different.
In cobra, your pelvis and legs stay on the mat. The lift comes from your back muscles, with your arms offering support rather than doing all the lifting. You can practice it with bent elbows.
In upward facing dog, the pelvis lifts off the mat entirely, you're on the tops of your feet, and your arms are straight. It's a more demanding pose that requires greater spinal extension and shoulder stability. The two poses appear next to each other in sun salutations, and understanding the distinction helps you choose the right one for where you are today.
If you're in the early weeks of building your practice, cobra is usually the better choice. You can read more about sun salutations and how these poses fit together.
Building Toward a Steady Practice
Cobra is one of those poses that rewards patience. If you practice it consistently and stay at a comfortable height, your spine gradually becomes more responsive and the lift feels easier.
A simple progression to follow over a few weeks: first, focus purely on hand placement and elbow position. Then, start noticing whether your back muscles are doing the work. Finally, experiment with adding one or two breaths to your hold.
Pairing cobra with poses that involve the opposite action deepens the benefit. Mountain pose helps you develop the upright awareness that translates into better spinal extension once you're on the mat. After cobra, a counterpose like downward facing dog lets the spine decompress and return to neutral.
Listen to your body throughout. A mild sensation of stretch across the front of the chest or a gentle strengthening feeling in the back is normal. Sharp pain, especially in the lower back or radiating down a leg, is a signal to stop and talk with a healthcare provider before continuing.
Frequently Asked Questions
How high should I lift in cobra pose? Only as high as you can go without compressing the lower back or losing your breath. For many beginners, that's two or three inches off the mat. Height is not the goal; length through the spine is. A low cobra done with good alignment is far more useful than a high one done with tension.
Can I do cobra if I have a bad back? It depends on the nature of your back issue. Cobra can be helpful for some people and contraindicated for others. If you've had a herniated disc, sciatica, or recent back injury, speak with your doctor or physical therapist before trying any backbend. A qualified yoga teacher who knows your history can also guide you toward the right modifications.
Why do I feel cobra mostly in my lower back, not my upper back? This usually means the lumbar spine is doing most of the work while the thoracic spine stays relatively flat. Try focusing on drawing your shoulder blades down your back and lifting from the breastbone before you push into the floor with your hands. Moving your hands further toward your hips can also shift the load.
How long should I hold cobra? Three to five breaths is a good starting target. As you build familiarity with the pose, you can experiment with holding longer, but there's no particular benefit to holding beyond what feels steady and comfortable.
Is cobra the same as baby cobra? Baby cobra is an informal term for a very low version of the pose, typically with the hands barely pressing and the lift coming entirely from the back muscles. It's a useful teaching point rather than a separate pose. If your teacher cues it, think of it as permission to stay low and focus on muscular engagement rather than height.