How to Do Downward-Facing Dog (Adho Mukha Svanasana)
Learn how to do downward dog step by step, with beginner-friendly cues, modifications, and fixes for the most common mistakes.
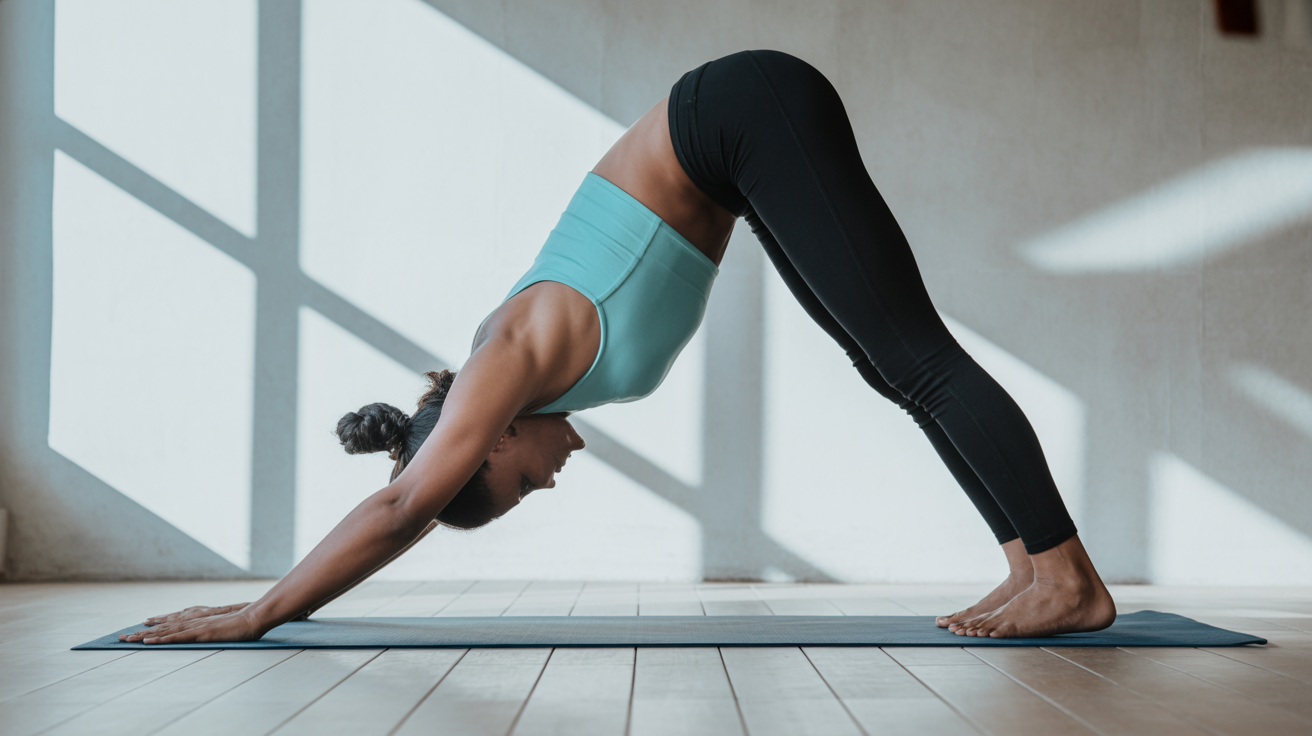
Downward-Facing Dog shows up in almost every yoga class you'll ever take, which is exactly why it's worth getting comfortable with early. It looks like a simple upside-down V, but there's a lot happening: your hands and feet press into the floor while your hips lift up and back, and your whole back body gets a long, satisfying stretch.
If you've ever tried it and felt like your hamstrings were on fire or your wrists were begging for mercy, you're in good company. The pose isn't about touching your heels to the ground or having loose hamstrings on day one. Here's how to do downward dog in a way that actually feels good, plus the small adjustments that make a big difference.
What Downward Dog Is and Why It's Everywhere
Adho Mukha Svanasana (AH-doh MOO-kah shvah-NAHS-anna) translates roughly to "downward-facing dog pose." If you've watched a dog wake up and stretch its front legs forward while lifting its tail, you've seen the shape in the wild.
Teachers lean on it for a reason. It stretches the calves, hamstrings, and shoulders, it builds strength in the arms and core, and it works as a resting pose once your body learns the shape. In a flow, it's often the place you return to between standing poses, almost like a home base.
For a beginner, the real value is that it teaches you how to distribute weight and lengthen your spine, two skills that carry into nearly every other pose. If you're still building your foundation, it pairs well with the other shapes covered in these 12 foundational yoga poses every beginner should learn.
Step-by-Step: How to Do Downward Dog
Start on your hands and knees in a tabletop position. Take your time with each step rather than rushing into the full shape.
- Set your hands. Place them shoulder-width apart, fingers spread wide, with your middle fingers pointing straight ahead. Press firmly through the knuckles and fingertips, not just the heels of your hands.
- Set your feet. Tuck your toes under so the balls of your feet are on the mat. Feet stay about hip-width apart.
- Lift up. On an exhale, press into your hands and lift your knees off the floor. Send your hips up and back toward the ceiling.
- Bend your knees generously. This is the step beginners skip. Keep a big bend in your knees at first so you can focus on lengthening your spine instead of straining your hamstrings.
- Lengthen your back. Imagine someone gently pulling your hips up and away from your hands. You want a long, straight line from your wrists to your hips.
- Soften the heels down. Let your heels drop toward the floor without forcing them. They may not touch, and that's completely normal.
- Relax your head and neck. Let your head hang between your upper arms. Gaze toward your feet or your navel.
Hold for three to five slow breaths to start. Then lower your knees back to the mat and rest. As you get stronger, you can build up to holding for 30 seconds to a minute.
What it should feel like
You should feel a stretch along the backs of your legs and through your shoulders, plus some work in your arms and core. A gentle, spread-out sensation is the goal. Sharp, pinching, or joint-specific pain is your cue to back off, shift your weight, or come out of the pose entirely.
Common Beginner Mistakes (and Quick Fixes)
Most of the discomfort people blame on the pose is actually a small alignment habit that's easy to correct. Here are the ones that come up again and again.
| Mistake | What it feels like | The fix |
|---|---|---|
| Straight legs too soon | Hamstrings screaming, rounded back | Bend the knees a lot; straighten gradually over weeks |
| Weight dumped into wrists | Wrist pain or pressure | Press the knuckles down; push hips back to shift load |
| Rounded upper back | Shoulders creeping toward ears | Reach hips higher, draw shoulders away from ears |
| Hands too close to feet | Feeling cramped and compressed | Walk hands forward so the body makes a long V |
| Holding the breath | Tension, shakiness, fatigue | Keep a steady inhale-exhale rhythm the whole time |
The breathing one matters more than it sounds. When the pose gets challenging, the instinct is to clench and hold your breath, which makes everything harder. Long, even breaths keep your muscles working without panicking.
Down Dog Modifications That Actually Help
There's no prize for a "perfect" looking pose, and modifying isn't cheating. The right adjustment lets you get the benefits without the strain. These down dog modifications are the ones I reach for most with beginners.
- Bent knees, always available. The single most useful change. Keep them as bent as you need to keep your spine long.
- Hands on a wall. Stand facing a wall, place your palms on it at hip height, and walk your feet back until your torso is roughly parallel to the floor. This is a gentle standing version that takes pressure off the wrists entirely.
- Forearms down (Dolphin Pose). Come onto your forearms instead of your hands. Great if your wrists complain in the full pose.
- Blocks under the hands. Lifting the floor up to you can ease tight shoulders and hamstrings.
- Heels against a wall. Pressing your heels into a wall behind you gives your feet something to push against and helps you find the back-and-up direction.
- Pedal the feet. Bend one knee, then the other, alternating. This warms up tight calves before you settle into a still hold.
If you find your wrists are the limiting factor, spreading your fingers and gripping the mat slightly (like making a suction cup with your palm) redistributes the pressure. Stretching your wrists before practice helps too.
How long and how often
You don't need to hold it for ages to benefit. Here's a simple way to build up without overdoing it.
| Stage | Hold time | Notes |
|---|---|---|
| First week or two | 3 breaths | Knees bent, focus on the shape |
| Weeks 3 to 4 | 15 to 30 seconds | Start softening heels down |
| Comfortable | 30 to 60 seconds | Straighten legs only as far as feels good |
Linking It Into Your Practice
Downward dog rarely stands alone. It connects to the poses around it, and learning those transitions makes your practice feel smoother.
A common beginner sequence: start standing tall, fold forward, step or walk your hands out to a plank, then press back into downward dog. Strong, grounded standing posture sets up everything that follows, so it's worth getting mountain pose, Tadasana, correct early on.
When down dog starts to feel like too much, you don't have to push through. Drop your knees, bring your hips back toward your heels, and rest. That little reset is essentially child's pose, Balasana, for rest and reset, and switching between the two is a lovely way to practice when you're tired or new. Moving back and forth, three breaths in down dog, three in child's pose, builds endurance gently.
A Few Safety Notes
Yoga is a physical activity, so move with a little common sense. Never force a stretch or yank your heels to the floor; let range of motion come over time. If you feel sharp or pinching pain in a joint, especially the wrists, shoulders, or lower back, come out of the pose and reassess your setup. Keep breathing the whole way through.
If you're pregnant, recovering from an injury, or managing a health condition like high blood pressure or a wrist issue such as carpal tunnel, check with your doctor before adding this pose to your routine. This article is educational and isn't a substitute for personalized medical advice.
FAQ
Why can't I get my heels to touch the floor?
Most likely tight calves and hamstrings, which is extremely common and not a flaw. Your heels touching the mat is not the goal of the pose. Keep a soft bend in your knees, focus on lengthening your spine, and the heels will lower over weeks and months as your flexibility grows.
My wrists hurt in downward dog. What should I do?
First, spread your fingers wide and press down through your knuckles and fingertips, not just the heels of your hands. Shifting your hips up and back also moves weight off the wrists. If pain continues, switch to Dolphin Pose on your forearms or do the standing wall version instead.
How long should I hold downward dog as a beginner?
Start with three slow breaths and rest. Over a few weeks, build toward 15 to 30 seconds, and eventually a minute if it feels comfortable. Quality matters more than duration, so come down whenever your form starts to fall apart.
Is downward dog supposed to be a resting pose?
Eventually, yes. In many classes it's used as a brief pause between harder poses. For a true beginner it can feel like hard work at first, and that's normal. As your strength and flexibility improve, it gradually becomes a place you can breathe and recover.
Should my legs be completely straight?
Not necessarily, and definitely not on day one. Straight legs with a rounded back help no one. Bend your knees as much as you need to keep your back long and flat, then straighten only as far as your hamstrings comfortably allow.