How to Do Warrior I and Warrior II (Step by Step)
Clear, beginner-friendly instructions for Warrior I and Warrior II yoga poses, with alignment tips, common mistakes, and safe modifications.
Warrior I and Warrior II are two of the most common standing poses in yoga. They show up in beginner classes, flow sequences, and sun salutations alike. Both poses build leg strength, open the hips and chest, and help you develop stability through your feet. If you have been curious about how to do them safely and get the alignment right, this guide walks you through each one in plain language.
If you are pregnant, recovering from an injury to the knees, hips, or shoulders, or have any health condition that affects your balance or joint stability, check with your doctor or a qualified healthcare provider before starting. Listen to your body throughout and modify freely.
What Is the Difference Between Warrior I and Warrior II?
They share the same wide stance, but the orientation of the hips and upper body is different.
Warrior I (Virabhadrasana I): The hips face forward, toward the front of the mat. Both arms reach straight up. This creates a sensation of lifting through the torso while rooting through the feet.
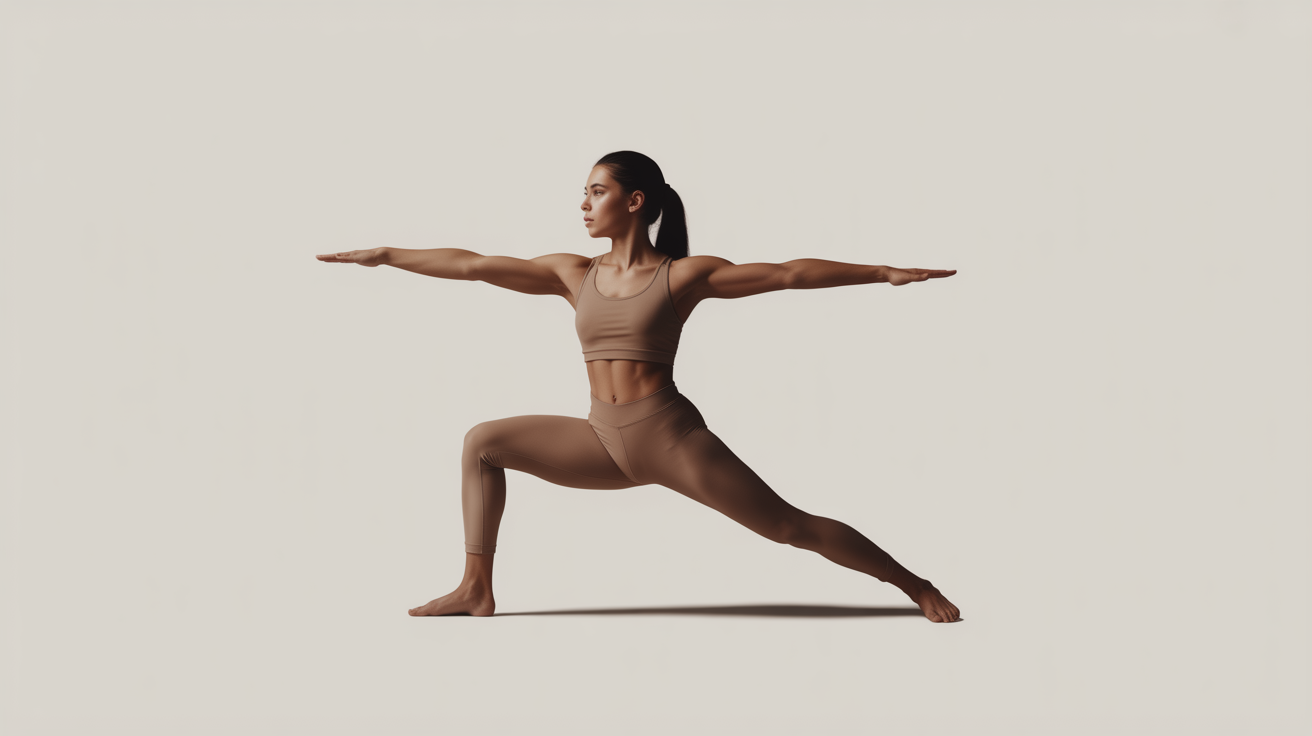
Warrior II (Virabhadrasana II): The hips open to the side. Arms extend in opposite directions, parallel to the floor, so you are looking out over your front middle finger. This feels more expansive and grounded.
Understanding the difference helps you set up each pose intentionally rather than just moving your arms.
How to Do Warrior I Step by Step
Start from a standing position at the top of your mat. Pair the steps with steady breathing as you go.
Set Your Stance
Step your left foot back about three to four feet. The distance depends on your height; a longer stride gives more stability. Turn your left foot out to roughly 45 degrees and press it firmly into the mat. Your right foot stays pointing straight ahead.
Square Your Hips
This is the most important part of Warrior I. Draw your left hip forward and your right hip back until both hip points face the front of your mat as evenly as possible. Your hips may not fully square, especially if your hamstrings or hip flexors are tight. That is fine. Go only as far as your body allows today.
A helpful adjustment: place your hands on your hips and gently nudge them into alignment. You will feel when one side is pulling ahead of the other.
Bend Your Front Knee
Bend your right knee and stack it directly above your right ankle. Your thigh moves toward parallel with the floor, but do not push past what is comfortable. If your knee starts to cave inward, press it gently out toward your pinky toe.
Lift Your Arms
Inhale and sweep both arms overhead. Palms can face each other or touch at the top, whichever feels better for your shoulders. Keep a slight softness in the elbows rather than locking them. Relax your shoulders away from your ears.
Hold and Breathe
Settle here for three to five breaths. Press down through the outer edge of your back foot. Feel your spine lengthen on each inhale. To come out, lower your arms and step your feet together.
Repeat on the other side.
How to Do Warrior II Step by Step
Warrior II feels different from Warrior I in the hips, so set up carefully.
Set Your Stance
Step your left foot back about three and a half to four feet. Turn your left foot to face the long edge of your mat at 90 degrees. Your right foot points straight to the short edge of your mat. The heel of your front foot roughly lines up with the arch of your back foot, or you can widen the feet a touch for more stability.
Open Your Hips to the Side
Unlike Warrior I, the hips in Warrior II face the long side of the mat. Let your left hip open out, and bring your right hip in slightly. You are not trying to square your hips forward here. The pelvis stays neutral, not tilted forward or tucked under.
Bend Your Front Knee
Bend your right knee to about 90 degrees if that is available to you, stacking the knee above the ankle. Keep your knee tracking over the second and third toes. If your knee wobbles inward, engage the outer hip muscles to stabilize it.
Extend Your Arms
Reach your arms out to the sides, parallel to the floor. Right arm extends over your right leg, left arm extends behind you. Turn your head to look out over your right hand. Palms face the floor.
Check Your Trunk
Your torso stays upright, not leaning forward or back over your front leg. Imagine the crown of your head lifting straight toward the ceiling.
Hold and Breathe
Stay for three to five breaths. Ground down through both feet equally. To exit, straighten your front knee, lower your arms, and bring your feet together before switching sides.
Alignment Details That Matter for Beginners
Getting a few specifics right makes these poses both safer and more effective.
| Common mistake | What to do instead |
|---|---|
| Front knee collapses inward | Press the knee toward the pinky-toe side of the foot |
| Back foot lifting at the heel | Press the outer edge of the back foot firmly into the mat |
| Shoulders creeping up by the ears | Roll the shoulders back and down before raising the arms |
| Leaning the torso over the front thigh | Stack the torso directly above the pelvis |
| Hips untouched in Warrior I | Actively draw the back hip forward |
Modifications and Props
You do not need to force the full version of either pose. Working within your current range keeps you safer and lets you build strength gradually.
Shorter stance: A narrower stance reduces the demand on your hips and knees. Start closer together and widen over time as you gain stability.
Higher back heel: In Warrior I, if your back heel lifts and you cannot press it down without strain, place a folded blanket or wedge under it. This gives your calf and ankle more room.
Chair support: If balance is a challenge, stand near a wall or the back of a sturdy chair and lightly rest a hand there while you find the shape of the pose.
Bent elbows in Warrior I: If lifting straight arms overhead causes shoulder discomfort, bend your elbows into a goalpost shape or place your hands on your hips instead.
Shorten the hold: Two or three breaths is plenty when you are new. Length of hold matters far less than quality of alignment.
These poses work well alongside Mountain Pose (Tadasana), which teaches you how to root through your feet before you add the complexity of a wide stance. You can also find both Warriors inside the sequence covered in 12 Foundational Yoga Poses Every Beginner Should Learn.
When you are ready to link poses together, Downward Facing Dog is a common transition point between Warrior I and Warrior II in many flow sequences.
Frequently Asked Questions
How long should I hold Warrior I or Warrior II? Three to five breaths is a solid target for beginners. That gives you time to settle into the pose and feel where your body is, without pushing into fatigue. You can gradually hold longer as you build strength over weeks.
My back knee hurts in these poses. What should I do? Come out of the pose and shorten your stance. A very wide step can put strain on the back knee. If discomfort continues or feels sharp, stop and talk to a healthcare provider before continuing.
Do I need to square my hips in Warrior II? No. Warrior II actually calls for hips that face the side, not forward. That is one of the key differences between the two Warriors. Only Warrior I asks the hips to orient toward the front.
Can I do these poses if I have tight hips? Yes, with modification. Use a shorter stance, place a blanket under your back heel in Warrior I, or simply hold the poses for fewer breaths. Tightness tends to ease over time with regular practice. Avoid forcing the hips into a range they are not ready for.
How do Warrior I and Warrior II fit into a beginner sequence? Many beginner flows move from Mountain Pose into Warrior I, then rotate the hips open to transition into Warrior II. They are often paired together for this reason. Once you know each pose individually, linking them becomes much more natural.